BTnode Development - Getting Started
This page gives a step-by-step install guide to the BTnode platform. It is intended mainly for newbies - experts might want to consult the general Installation page for a brief overview.
Quickstart
Installation is a three-step process:
For further questions, please refer to the BTnode tutorials, the and the mailing list archives.
Contents
(:toc:)
(:num:)
Install the Platform-Specific Tool-Chain
See the platform specific tool installation instructions:
We recommend using Windows as a development system, but any of the others work just as fine. If you are interested in the latest releases or want to build your own toolchain please check the Links section.
Install the System Software
The BTnode system software is based on the NutOS project. For a complete system, you will need to install both the NutOS sources and the BTnode-specific extensions (i.e., drivers, Bluetooth stack) called BTnut.
Installing the BTnut Sources
You can either install the BTnut System Software a) from the BTnutCDROM or b) from a CVS server. The latter one ensures to get the most recent BTnut version.
(:nonum:)
a) Getting the sources from the BTnutCDROM
- Unpack BTnut_system_1.x.tar.gz from CDROM:\BTnut to your workspace (e.g., C:\workspace or ~/workspace). The files should be in the directory workspace/btnut now.
- Start Eclipse and go to the workbench.
- File->New->Project...: Standard Make C Project: Project Name: btnut (using this name should automatically load the contents from workspace/btnut)
- 'Finish'
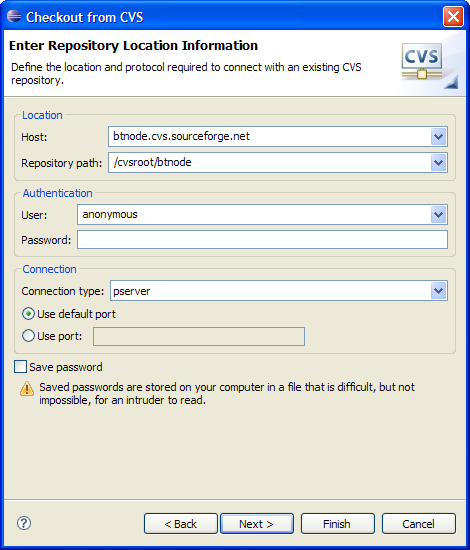
b) Getting the sources from CVS
The sources can be checked out using eclipse.
- File -> New -> Project...
- Select CVS | Checkout Projects from CVS. 'Next >'.
- Select Select a new repository location. 'Next >'.
- Fill out as shown in the screenshot. 'Next >'. Screenshot
- Use specific module name: btnut. 'Next >'.
- Select: Check out as a project configured using the New Project Wizard. 'Finish'
- Select Standard Make C Project. 'Next >'. Screenshot
- Project name: btnut. 'Finish'.
(:num:)
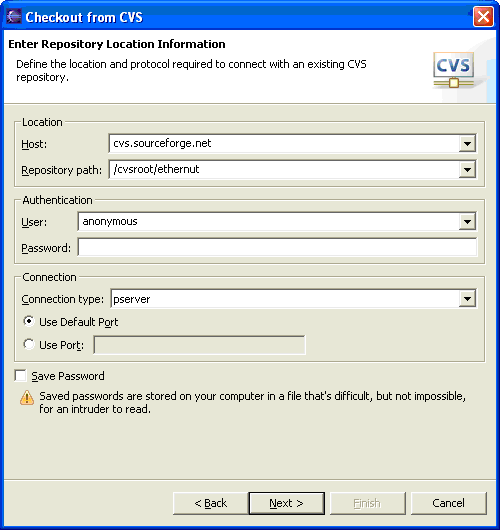
Fetch the NutOS sources
The NutOS version has to be fetched according to the BTnut version (the sources installed in the previous step). In order to do that, the date of the NUT_SNAPSHOT needs to be looked up in the btnut.Makefile. Check for the entry NUT_SNAPSHOT = yyyy-mm-dd and remember the date.
- File -> New -> Project...
- Select CVS | Checkout Projects from CVS. 'Next >'.
- Select Select a new repository location. 'Next >'.
- Fill out accordingly. 'Next >'. Screenshot
- Use specific module name: nut. 'Next >'
- Select: Check out as a project configured using the New Project Wizard. 'Next >'.
- Select appropriate tag
- 'Configure Tags...'
- 'Add Date...'
- Enter the NUT_SNAPSHOT date as looked up previously. 'OK'. 'OK'.
- Select the date and Finish. Screenshot
- Select Standard Make C Project. Screenshot
- Project name: nut. 'Finish'. Screenshot
The sources are now being checked out to the directory workspace/nut.
Setup Make Target in Eclipse
- Make Target install
- Window -> Show View -> Make Targets
- In the Make Target subwindow: Right click on btnut
- Select Add Make Target from the popup menu
- Target Name: install | Make Target: install
- Screenshot
- Do the same for the Make Target clean
- Select Add Make Target from the popup menu
- Target Name: clean | Make Target: clean
- Screenshot
Building the sources
You can build the sources either under eclipse using the created make targets or on the command line (faster):
workspace/btnut> make install
Build and Upload a Sample Application
To verify the installation, we recommend to build and upload a sample application that comes with the system sources downloaded above: the bt-cmd.c application. In some cases you will need to install a bootloader application first that supports uploading new programs to the BTnode.
Build Sample Application and the Bootloader
You can build the sample application using either the a) Console or b) Eclipse. Either way the sample application should be compiled without errors.
(:nonum:)
a) Console
- Sample Application
- Change to the directory workspace/btnut/app/bt-cmd.
workspace/btnut/app/bt-cmd> make btnode3. (This will create the file: bt-cmd.btnode3.hex)
- Bootloader
- Change to the directory workspace/btnut/app/bootloader.
workspace/btnut/app/bootloader> make btnode3. (This will create the file: bootloader.btnode3.hex)
b) Eclipse
- Make Target for sample application
- In the Make Target subwindow: Right click on btnut/app/bt-cmd.
- Select Add Make Target from the popup menu.
- Target Name: btnode3 | Make Target: btnode3.
- Double click the the just created 'btnode3-target'. (This will create the file: bt-cmd.btnode3.hex)
- Do the same for the bootloader
- In the Make Target subwindow: Right click on btnut/app/bootloader.
- Select Add Make Target from the popup menu.
- Target Name: btnode3 | Make Target: btnode3.
- Double click the the just created 'btnode3-target'. (This will create the file: bootloader.btnode3.hex)
(:num:)
Install and identify the USB upload port
In order to communicate with the BTnode (once it is installed and is running out bootloader program), we use an extension board with a Silabs CP2101 USB controller chip. The CP2101 allows us to attach the BTnode to the USB port of our computer and have our Atmel microcontroller talk to the PC using UART (i.e., serial) communication. For this, we first need to install the appropriate drivers that create a virtual COM (serial) port. This port can then be used to both upload new programs and to input or output program data (e.g., printf statements).
See the platform specific instructions:
- Windows USB
- Linux USB
- Mac OS X USB
Upload Sample Application (.hex file)
Remember that in order to upload an application using the USB serial bridge, the bootloader must be installed beforehand. You can verify if your BTnode has a working bootloader with the help of the built-in LEDs:
- The LEDs will flash once after the BTnode is turned on (detach from the USB cable first!).
- They will continued to flash repeatedly if no application is installed.
If your BTnode does not react this way, it probably has no bootloader installed, or the bootloader has been damaged (e.g., overwritten) and must be re-installed. This is described in the box below.
(:nonum:)
Optional: Burn the bootloader to the BTnode rev3 using the AVR ISP Programmer
The following instructions are for the AVR Studio on Windows. You can uisp and/or avrdude on Linux/Mac OS X.
Unless your BTnode already comes with a bootloader pre-installed, you will need to initialize it once in order to be able to upload applications through its USB interface. This requires an AVR ISP Programmer, i.e., a piece of hardware that directly flashes the Atmel memory.
Note: The instruction below allow you to upload any .hex file (program) to the BTnode rev3. However, as the AVR ISP Programmer is not very reliable and quiet slow, we strongly recommend to use it only to upload the bootloader! Once the bootloader is installed, it will allow us to upload .hex files using the USB serial bridge.
- Install AVR Studio from CDROM:\tools\avr_win_stuff\AVRStudio410b356.exe (it doesn't hurt to install/upgrade USB driver - it would be required for the JTAG ICE connector)
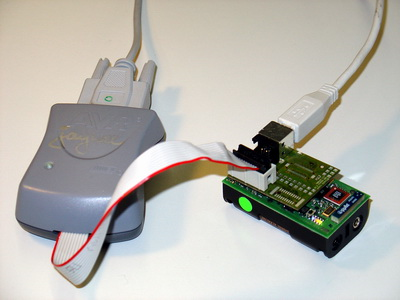
- Connect the AVR ISP Programmer to your PC and to the BTnode rev3 USB Adapter board having the BTnode rev3 attached to it Screenshot. If everything is connected properly the green led on the AVR ISP Programmer should be green.
- Start AVR Studio 4 and start AVR ISP (Tools->STK500/AVRISP/JITAG ICE->STK500/AVRISP/JITAG ICE...)
- Upload the bootloader
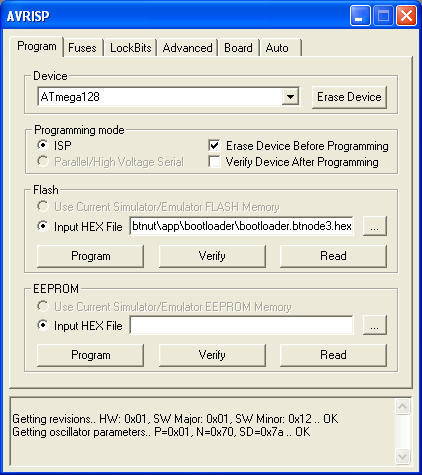
- If the connection could be established, the bottom window should show something like:
 Getting revisions.. HW: 0x01, SW Major: 0x01, SW Minor: 0x12 .. OK
 Getting oscillator parameters.. P=0x01, N=0x70, SD=0x7a .. OK
- The AVR ISP is not reliable if the transfer rate is high. Therefore switch to the Board-Tab and change the oscillator frequency to 32.7 kHz (do not forget to confirm pressing the 'Write Osc.' button).
- Switch back to the Program Tab. Device: ATmega128. Deselect Verify Device After Programming'. Flash: Input HEX File C:\workspace\btnut\app\bootloader\bootloader.btnode3.hex. Screenshot.
- Press 'Program' button.
- After uploading the four flashing leds on the BTnode rev3 show a successful upload of the bootloader. Retry otherwise.
As long the bootloader is on the BTnode rev3 is installed, the AVR ISP Programmer is not required anymore and can be unplugged. However, note that a corruption of the bootloader is possible if a very large application is uploaded - in such cases you will need to reinstall the bootloader using the procedure above!
As soon as the bootloader is installed, it is recommended to access BTnode rev3 via USB and the USB prog board - due to performance reasons.
The application can be uploaded using the a) Console (easier) or b) Eclipse (a bit cumbersome). In both cases you will need to know the COM-port that you hopefully remembered from the previous step. In the following, please substitute this whenever we write COMPORT:
(:nonum:)
a) Console
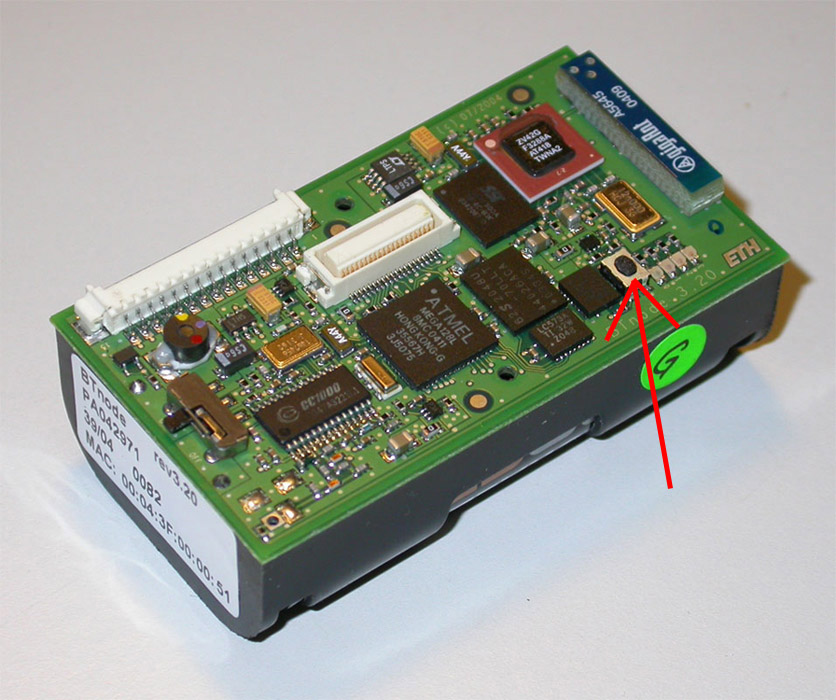
- Press and hold the reset button of the BTnode rev3 (if you can't find it, look here.)
cdintoworkspace/btnut/app/bt-cmdand issueuisp -v=3 -dprog=stk500 -dpart=atmega128 -dserial=COMPORT --erase --upload if=bt-cmd.btnode3.hex- When using Windows, you can also use the sburn.bat file:
sburn bt-cmd.btnode3.hex COMPORT.
- When using Windows, you can also use the sburn.bat file:
- Release the reset button.
- A success is indicated by a lot of text, hashes and something like:
(total 59580 bytes transferred in 7.99 s (7452 bytes/s)
- A failed upload is indicated by something like:
[VP 1] Device is not responding correctly.
- Try again if it doesn't work.
- Sometimes you will get the error message below (a bug in prior
bootloaderversions). Your upload was usually successful though (so you can ignore it):
- Sometimes you will get the error message below (a bug in prior
[LPM] Device is not responding correctly
Windows Users: If it still does not work - this is due to a bug in WINAVR and will be corrected with the next release. As a workaround, unplug the USB cable from the USB prog board and plug it in again. Then repeat steps 1 through 4.
b) Eclipse
- Setup
workspace/btnut/Makedefsto reflect your setup.
 ifndef BURN
   BURN        = uisp
 endif
 ifndef BURNPORT
   BURNPORT    = COMPORT
 endif
 ifndef BURNFLAGS
   BURNFLAGS= -v=3 -dprog=stk500 -dpart=atmega128 -dserial=$(BURNPORT)
 endif
- Set
BURNto uisp - Set
BURNPORTto useCOMxor/dev/comx/when using Windows/Cygwin, or/dev/ttyUSBxwith Linux or MacOS X - Set
BURNFLAGSas given above (seeMakedefswhen usingavrdude)
- Set
- Setup
workspace/btnut/Makerulesaccordingly (i.e., make sure the line below is active):
  burn.btnode3: $(TARG.btnode3)
	$(BURN) $(BURNFLAGS) --erase --upload if=$(TARG.btnode3)  # uisp
- Create Upload Target
- Right click appropriate application (btnut/app/bt-cmd)
- Add Make Target
- Target Name upload | Make Target btnode3 upload
- Press and hold the reset button of the BTnode rev3
- Execute target
- Release the reset button.
- A success is indicated by something like:
 Atmel AVR ATmega128 is found.
 Uploading: flash
 Firmware Version: 1.15
 Firmware Version: 1.15
 make[1]: Leaving directory `workspace/btnut/app/bt-cmd'
- A failed upload is indicated by something like:
[VP 1] Device is not responding correctly
- Try again if it doesn't work.
- Sometimes you will get the error message below (a bug in prior
bootloaderversions). Your upload was usually successful though (so you can ignore it):
- Sometimes you will get the error message below (a bug in prior
[LPM] Device is not responding correctly
Windows Users: If it still does not work - this is due to a bug in WINAVR and hopefully will be corrected in an upcoming release. As a workaround, simply unplug USB cable from the USB prog board and plug in again. Then try step 3 - 6 again.
(:num:)
Verify the Application (Connect to the Serial Terminal)
In order to verify that the application has been successfully installed and is working correctly, we need to capture its output via the USB cable. For this, we use a terminal application such as HyperTerminal (on Windows) or minicom (on Linux)
(:nonum:)
Hyperterm (Windows)
Create a new Connection in the HyperTerminal (Programs->Accessories->Communications->HyperTerminal)
- Connect To: COMx (COM-Port of the BTnode USB prog)
- Port Settings:
- Bits per second: 57600
- Data bits: 8
- Parity: None
- Stop bits: 1
- Flow Control: None
Minicom (Linux)
minicom /dev/ttyUSB0(or whateverCOMPORTyou are using)- Type Ctrl-A followed by O (the letter, not the number) for configuration
- Choose Serial port setup
- Choose E for communication parameters, then select H and Q (i.e.,
57600 8N1) - Use F and G to disable all flow control
- Hit Return/Enter and choose Exit
- For help, type Ctrl-A followed by Z.
- To exit minicom, type Ctrl-A followed by X
- You can also save default settings. See
man minicomfor details.
Now reset the BTnode. You should see something like:
 # --------------------------------------------
 # Welcome to BTnut (c) 2005 ETH Zurich
 # bt-cmd program version: 20051115-1312
 # --------------------------------------------
 booting bluetooth module... ok.
 hit tab twice for a list of commands
 [bt-cmd@btnode]$
Congratulations, you have successfully built and uploaded the sample application!